Customers using AWS can transfer data using DataSync. This section explains step-by-step in detail how to use DataSync to transfer data from Moloco Storage to your AWS S3 bucket.
1. What is AWS DataSync?
AWS DataSync is an online data movement and discovery service that simplifies data migration and helps us quickly, easily, and securely transfer files or object data to, from, and between AWS storage services. It works with not only On-premises storage systems and AWS storage services such as S3, EFS, etc. but also cloud storage services such as Google Cloud Storage (GCS), Microsoft Azure Blob Storage, etc.
2. Overview
Moloco exports and stores customer data in GCS, so this guide shows how you can use AWS DataSync to migrate customer data stored in a GCS bucket using DataSync.
Because DataSync integrates with the Google Cloud Storage XML API, you can copy objects into Amazon S3 without writing code. The DataSync agent can be deployed on Google Cloud or AWS, and here we will guide you on how to place it on AWS.
The following diagram illustrates the transfer.
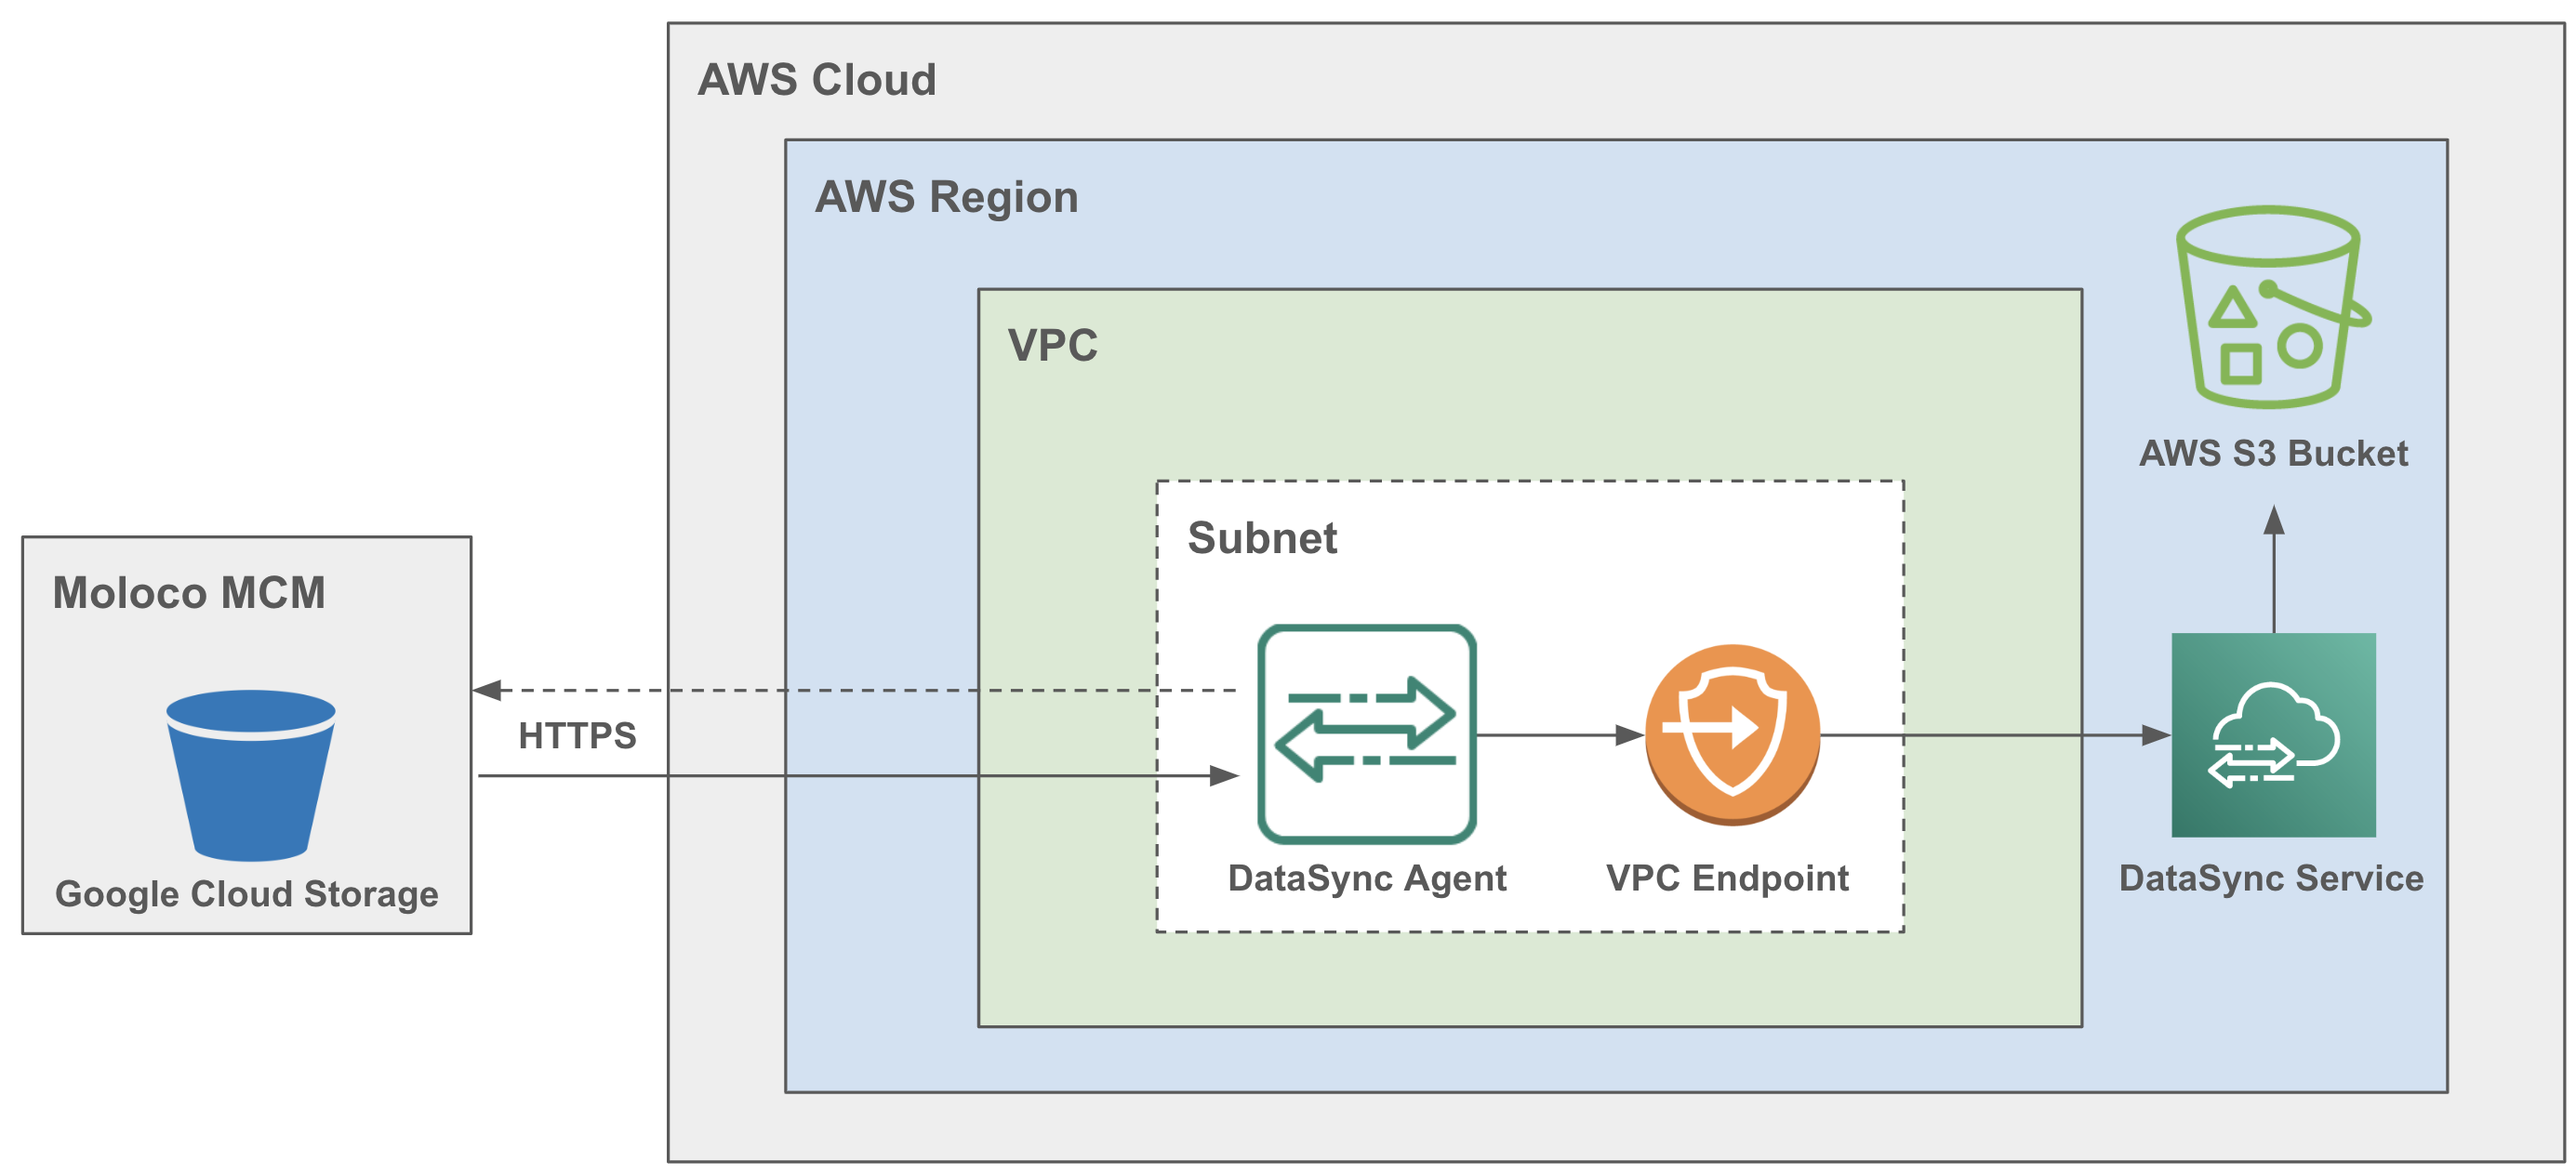
- You deploy a DataSync agent in a virtual private cloud (VPC) in your AWS environment.
- The agent reads your Google Cloud Storage bucket by using a Hash-based Message Authentication Code (HMAC) key.
- The objects from your Google Cloud Storage bucket move securely through TLS 1.3 into the AWS Cloud by using a private VPC endpoint.
- The DataSync service writes the data to your S3 bucket.
3. Prerequisites
Before you begin, do the following if you haven’t already:
- Ask Moloco Customer Support to get the followings
- HMAC key’s access ID and secret (For Step 1)
- GCP bucket where exported data is stored (For Step 4)
- Set up the AWS Command Line Interface (AWS CLI) (For Step 3)
- Create an Amazon S3 bucket for storing exported data (For Step 5)
4. Steps to create a DataSync task
Step 1: Creating an HMAC key for your Google Cloud Storage bucket
DataSync uses an HMAC key that's associated with a Google service account to authenticate with. To get HMAC key’s access ID and secret, please contact Moloco Customer Support.
Step 2: Configure your network
You need a VPC with an interface endpoint. DataSync uses the VPC endpoint to facilitate the transfer.
To configure your network for a VPC endpoint
- If you don't have one, create a VPC in the same AWS Region as your S3 bucket.
- Create a private subnet for your VPC.
- Create a VPC endpoint for DataSync by using AWS PrivateLink.
- Configure your network to allow DataSync transfers through a VPC endpoint. To make the necessary configuration changes, you can modify the security group that's associated with your VPC endpoint. DataSync requires the following ports for your agent to use a VPC endpoint.
| From | To | Protocol | Port |
|---|---|---|---|
| Your web browser | Your DataSync agent | TCP | 80 (HTTP) |
| DataSync agent | Your DataSync VPC endpoint To find the correct IP address, open the https://console.aws.amazon.com/vpc/, and choose Endpoints from the left navigation pane. Choose the DataSync endpoint, and check the Subnets list to find the private IP address that corresponds to the subnet that you chose for your VPC endpoint setup. For more information, see step 5 in https://docs.aws.amazon.com/datasync/latest/userguide/datasync-in-vpc.html#create-agent-steps-vpc. | TCP | 1024–1064 |
| DataSync agent | Your task's network interfaces To find the related IP addresses, open the Amazon EC2 console and choose Network Interfaces from the left navigation pane. To see the four network interfaces for the task, enter your task ID in the search filter. For more information, see step 9 in https://docs.aws.amazon.com/datasync/latest/userguide/datasync-in-vpc.html#create-agent-steps-vpc. | TCP | 443 (HTTPS) |
| DataSync agent | Your DataSync VPC endpoint | TCP | 22 (Support channel) |
Step 3: Create a DataSync Agent
You need a DataSync agent that can access and read your Google Cloud Storage bucket. The agent runs as an Amazon EC2 instance in a VPC that's associated with your AWS account.
To create an agent,
- Open the AWS DataSync console at https://console.aws.amazon.com/datasync/.
- In the left navigation pane, choose Agents, and then choose Create agent.
- And then follow the detailed steps for each section
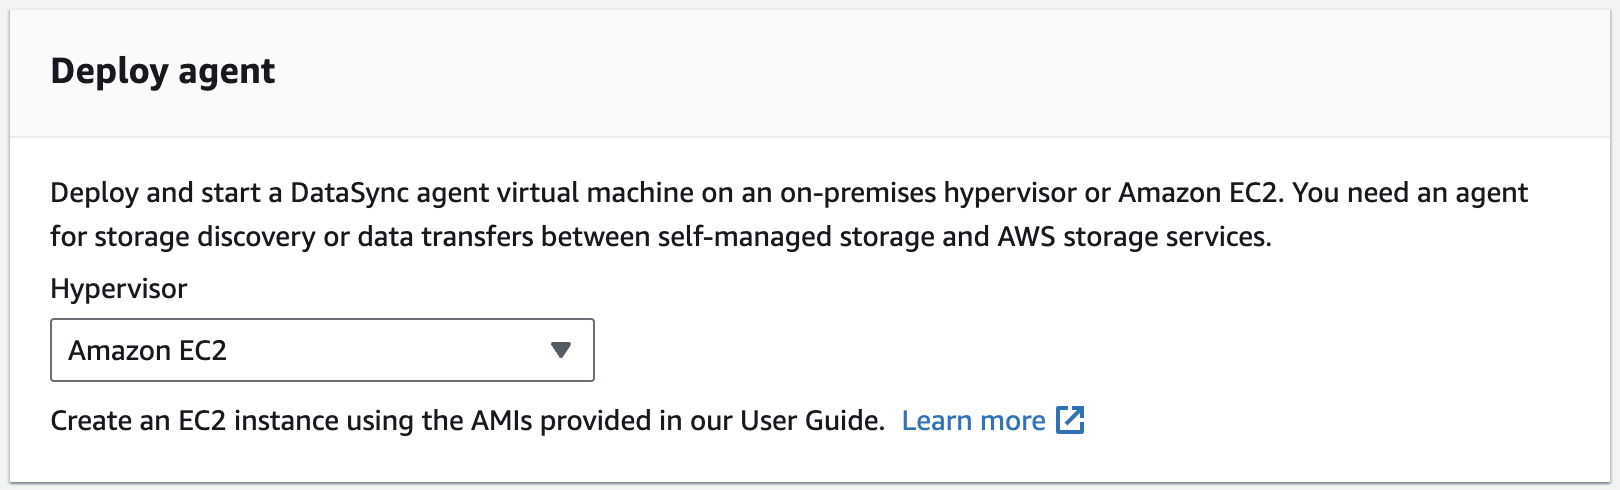
Step 3-1: Deploy agent
Choose Amazon EC2 and follow the steps below.
Info
You can also refer to this guide provided by Amazon - Deploy your agent on Amazon EC2
- Open a terminal. Make sure to configure your AWS CLI profile to use the account that's associated with your S3 bucket.
- Copy the following command. Replace
vpc-regionwith the AWS Region where your VPC resides (for example,us-east-1).
aws ssm get-parameter --name /aws/service/datasync/ami --region vpc-region
- Run the command. In the output, take note of the
"Value"property. This value is the DataSync Amazon Machine Image (AMI) ID of the Region that you specified. For example, an AMI ID could look likeami-1234567890abcdef0. - Copy the following URL. Again, replace
vpc-regionwith the AWS Region where your VPC resides. Then, replaceami-idwith the AMI ID that you noted in the previous step.
https://console.aws.amazon.com/ec2/v2/home?region=vpc-region#LaunchInstanceWizard:ami=ami-id
- Paste the URL into a browser. The Amazon EC2 instance launch page in the AWS Management Console displays.
- For Instance type, choose one of the following instance types.
- m5.2xlarge: For task executions working with up to 20 million files, objects, or directories.
- m5.4xlarge: For task executions working with more than 20 million files, objects, or directories.
- For Key pair, choose an existing key pair, or create a new one.
- For Network settings, choose the VPC and subnet where you want to deploy the agent.
- Choose Launch instance.
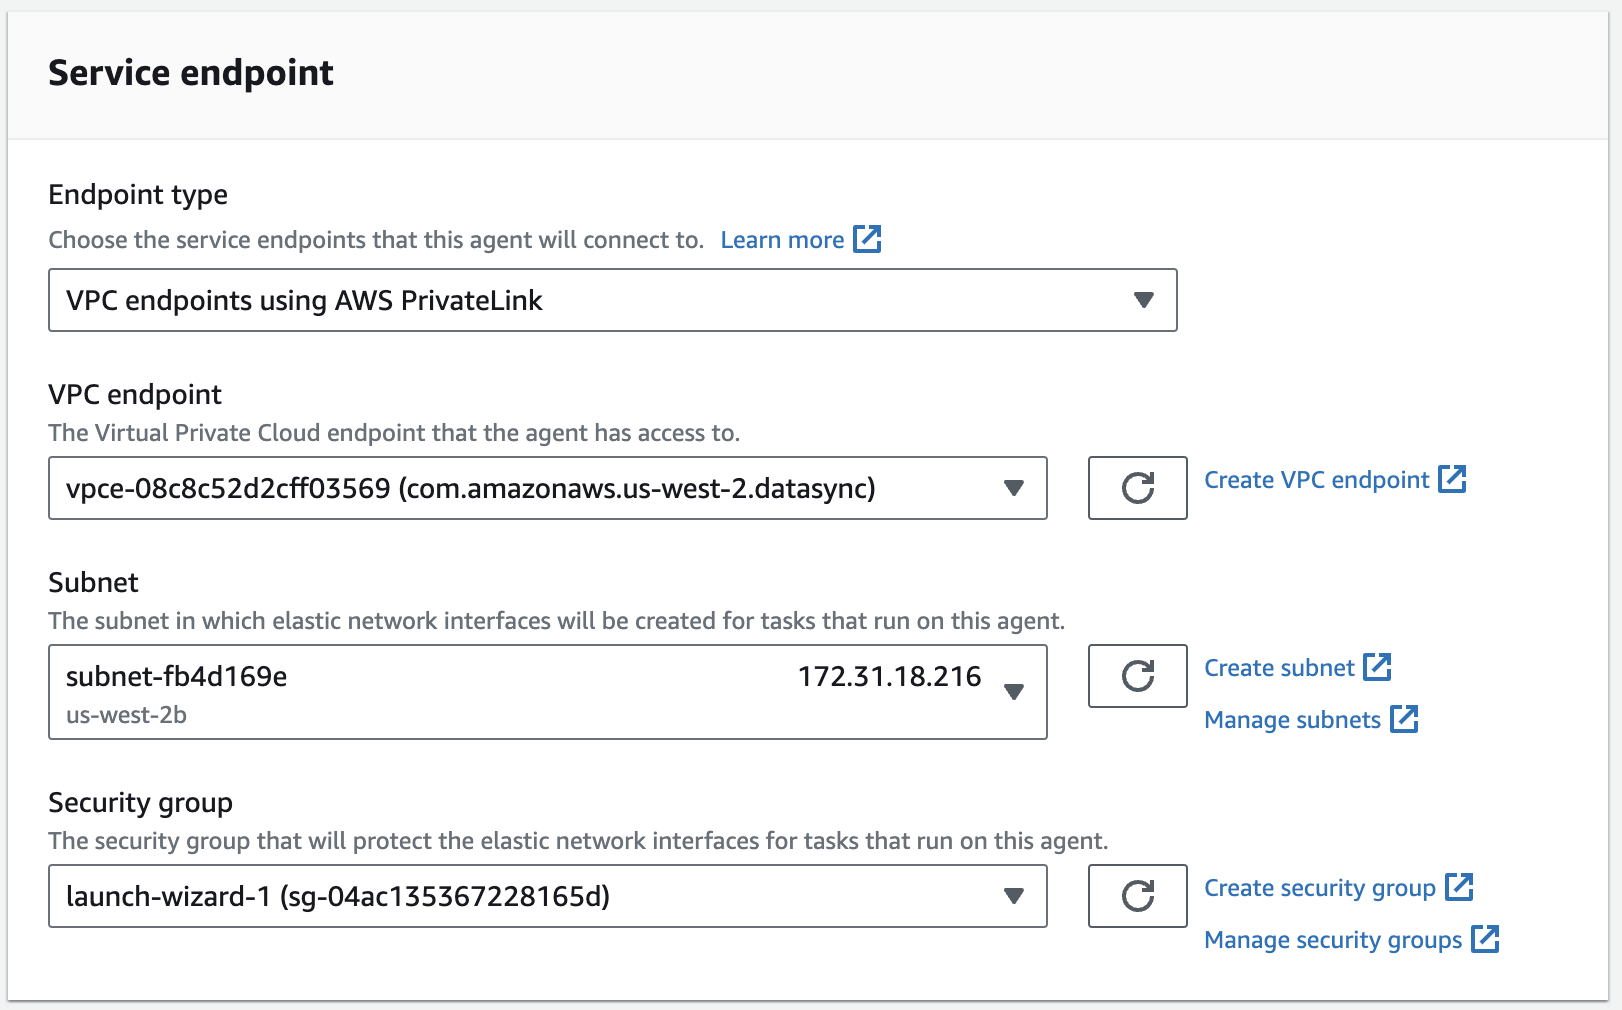
Step 3-2: Choose service endpoint
Info
You can also refer to this guide provided by Amazon - Choose a service endpoint for your AWS DataSync agent
- On the same Create agent page, go to the Service endpoint section.
- Choose
VPC endpoints using AWS PrivateLink - Choose the VPN endpoint configured in Step 2.
- Choose Subnet and Security group configured in Step 2 accordingly.
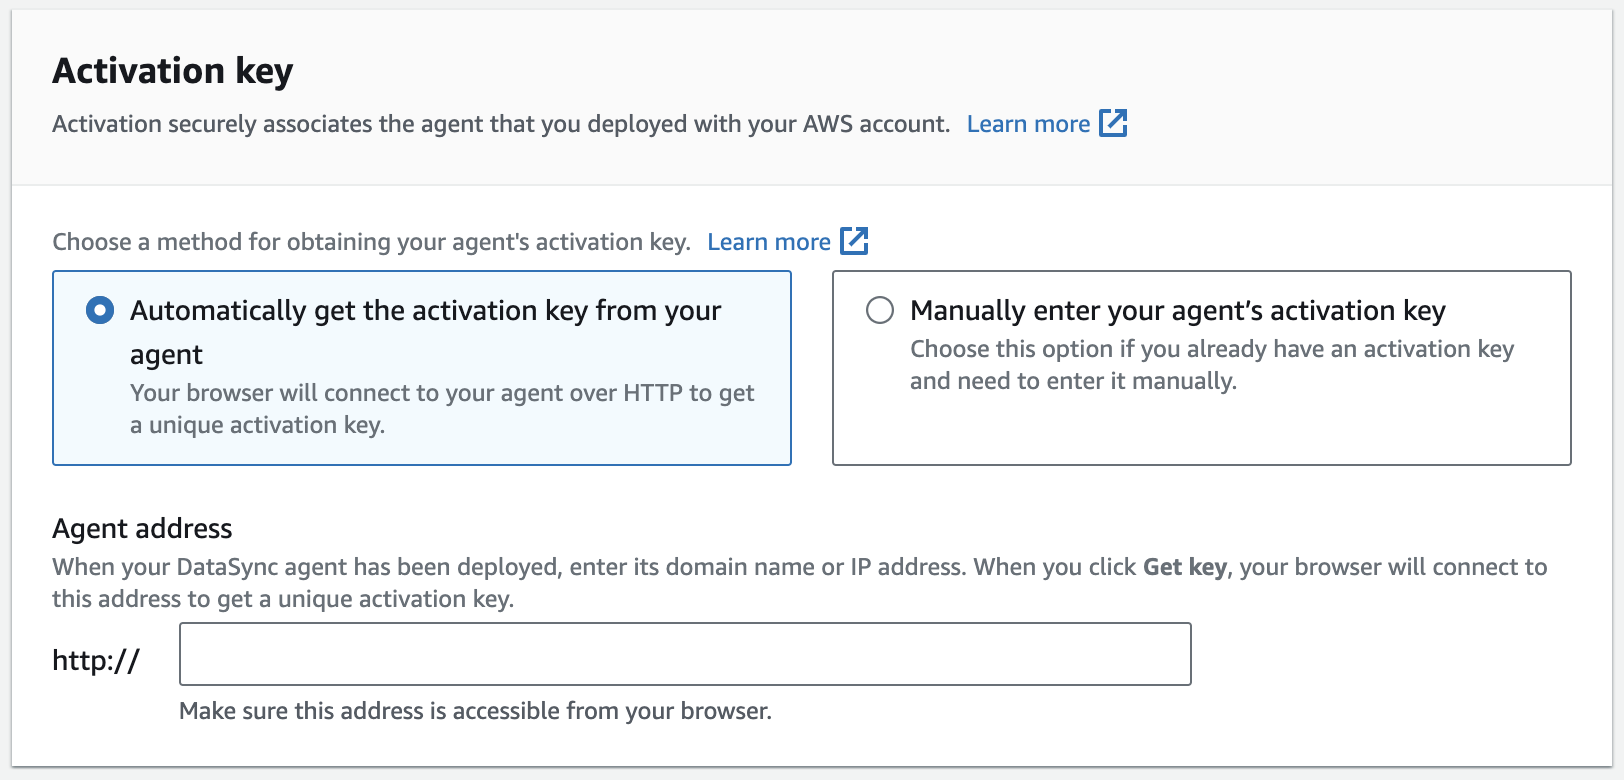
Step 3-3: Activate your agent
Info
You can also refer to this guide provided by Amazon - Activate your AWS DataSync agent
-
On the same Create agent page, go to the Activation key section.
-
Choose Automatically get the activation key from your agent to activate your agent:
- Automatically get the activation key from your agent – This option requires that your browser access the agent by using port 80. Once activated, the agent closes the port.
- For Agent address, enter the agent's public IP address or domain name and choose Get key.
- Your browser connects to the IP address and gets a unique activation key from your agent. If the activation fails, check your network configuration.
If you don't want a connection between your browser and agent use Manually enter your agent's activation key option
- Manually enter your agent's activation key
- Get the key from the agent's local console.
- Back in the DataSync console, enter the key in the Activation key field.
-
Info
Agent activation keys expire in 30 minutes if unused.
- Automatically get the activation key from your agent – This option requires that your browser access the agent by using port 80. Once activated, the agent closes the port.
-
(Optional) For Agent name, enter a name for your agent.
-
(Optional) For Tags, enter values for the Key and Value fields to tag your agent. Tags help you manage, filter, and search for your AWS resources.
-
Choose Create agent.
-
On the Agents page, verify that your service endpoint is correct.
Step 4: Create a DataSync source location for Moloco MCM Google Cloud Storage bucket
To set up a DataSync location for your Google Cloud Storage bucket, you need the access ID and secret for the HMAC key that you created in Step 1.
To create the DataSync source location
- Open the AWS DataSync console at https://console.aws.amazon.com/datasync/.
- In the left navigation pane, expand Data transfer, then choose Locations and Create location.
- For Location type, choose Object storage.
- For Agents, choose the agent that you created in Step 3.
- For Server, enter
storage.googleapis.com. - For Bucket name, enter the name of your Google Cloud Storage bucket.
- Expand Additional settings. For Server protocol, choose HTTPS. For Server port, choose 443.
- Scroll down to the Authentication section. Make sure that the Requires credentials check box is selected, and then do the following:
- For Access key, enter your HMAC key's access ID.
- For Secret key, enter your HMAC key's secret.
- Choose Create location.
Step 5: Create a DataSync destination location for your S3 bucket
You need a DataSync location for where you want your data to end up.
To create the DataSync destination location
- Open the AWS DataSync console at https://console.aws.amazon.com/datasync/.
- In the left navigation pane, expand Data transfer, then choose Locations and Create location.
- Create a DataSync location for the S3 bucket.
If you deployed the DataSync agent in your VPC, this tutorial assumes that the S3 bucket is in the same AWS Region as your VPC and DataSync agent.
Step 6: Create and start a DataSync task
With your source and destinations locations configured, you can start moving your data into AWS.
To create and start the DataSync task
-
Open the AWS DataSync console at https://console.aws.amazon.com/datasync/.
-
In the left navigation pane, expand Data transfer, then choose Tasks, and then choose Create task.
-
On the Configure source location page, do the following:
- Choose Choose an existing location.
- Choose the source location that you created in Step 4, then choose Next.
-
On the Configure destination location page, do the following:
- Choose Choose an existing location.
- Choose the destination location that you created in Step 5, then choose Next.
-
On the Configure settings page, do the following:
- Under Data transfer configuration, expand Additional settings and clear the Copy object tags check box.
-
Important
Because DataSync communicates with Google Cloud Storage by using the Amazon S3 API, there's a limitation that might cause your DataSync task to fail if you try to copy object tags.
- Configure any other task settings that you want, and then choose Next.
-
On the Review page, review your settings, and then choose Create task.
-
On the task's details page, choose Start, and then choose one of the following:
- To run the task without modification, choose Start with defaults.
- To modify the task before running it, choose Start with overriding options.
When your task finishes, you'll see the objects from your Google Cloud Storage bucket in your S3 bucket.
5. References
Updated about 1 month ago